Category: Plumbers

How to Prevent Leaking Pipes

Scranton Plumbers install, repair, and maintain pipes and fixtures for water, sewage, and heating systems. They need excellent listening skills to understand customer concerns and provide appropriate solutions.

Leaking Pipes

A running toilet, a leaky faucet, or a clogged drain are just a few of the plumbing problems that can arise in your home. But before you call a plumber, there are some things you should know.

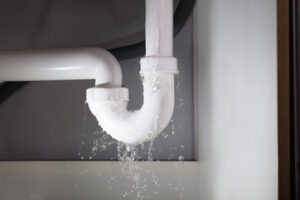
A leaking pipe can cause significant damage to walls, floors, and ceilings. While a plumber will be required to fix the leak, there are some things you can do to minimize the damage and prevent water from leaking into unwanted areas of your home.

The best way to spot a leak is to look for puddles around appliances or fixtures. This is usually a sign that the seals have deteriorated and that the water is flowing where it shouldn’t be. You can also check the water meter in your home. If you notice that there has been a sudden increase in your water usage, this may be a sign of a leak somewhere in the pipes.

If you do find a leak, turn off the water supply to that area and try to clean up any standing water. Next, you can use a patch clamp or pipe leak repair clamp to seal the leak temporarily. These devices are available at any hardware store and can be used to easily repair leaks in metal or plastic pipes. Simply locate the leaking section of pipe and fold the inner sleeve of the clamp over it, tightening the screws until the leak stops.

You can also use a water pipe sealing putty to repair smaller leaks. This can be purchased at most DIY or home improvement stores and consists of two components that when mixed create a powerful sealant. Once again, make sure that the water supply is turned off and that the pipe or pipe is dry before using the putty. Once it has cured, you can turn the water back on and check for further leaks.

If you are unable to locate the source of the leak or if the problem is severe, call a plumber as soon as possible. They can provide you with further advice on how to repair the issue and can ensure that the problem is not exacerbated by further damage. They can also perform a full inspection of the plumbing system to identify other problems and potential issues that might arise in the future.

Pipes can be damaged by age, wear and tear, or even by accidents. Regardless of the cause, when pipes break, water damage ensues, which can ruin valuable possessions and create a serious health risk. If you notice a leak in your home or building, it is important to turn off the water supply as quickly as possible to minimize damage and prevent further problems.

A broken pipe that goes unnoticed can lead to mold, mildew, and other dangerous bacterial growth. These bacteria can be spread through air and water and can pose a threat to your family’s health. In addition, a burst pipe can also cause flooding, further damage your property, and result in costly repairs. The best way to avoid these issues is by regularly checking your plumbing for problems and addressing them as soon as you notice them.

If a damaged pipe is ignored, it can result in the formation of mold, mildew, and other hazardous microorganisms. The health of your family may be at danger due to these germs, which can be transferred by water and air. A burst pipe can also result in floods, additional property damage, and expensive repairs. The greatest defense against these problems is to routinely inspect your plumbing and take care of any faults as soon as you find them.

If your water shut-off valve is not easily accessible, there are a few things you can try to get the situation under control until a plumber arrives. Duct tape and plumber’s putty are a good choice for temporary fixes, but you should always have a plumber’s number on hand in case of an emergency.

If the leak is at a threaded joint, you can try tightening it with an adjustable wrench. Be careful not to over-tighten, as this can damage the pipe. If the pipe is old or damaged, it may not hold a tight grip and you should consider replacing it instead.

Using a pipe repair clamp is another quick solution for leaking pipes. You can find these at most hardware and plumbing supply stores. Simply place the rubber sleeve over the damaged area, then mount the pipe clamp, making sure it extends at least one inch past the damage on each side. It is important to tighten the clamps snugly, but not overly tight.

Using epoxy to repair a leaky pipe or joint is a more permanent fix. You can purchase epoxy at most hardware and plumbing supplies stores. It is important to clean the damaged area and make sure water can’t reach it before applying the epoxy. If you are unsure how to use the epoxy or are uncomfortable with the task, it is a good idea to call in a professional.

If you find that your showers are ice cold, or your water heater is constantly running, it may be time to call a plumber. A professional can inspect your system and recommend the best repairs.

Plumbers install and repair pipes, fixtures, and appliances that facilitate the distribution of water, waste, and air in residential and commercial settings. They use a variety of tools and techniques to work in tight spaces and confined areas. A plumber’s job duties also include interpreting blueprints and building codes to ensure that plumbing systems are installed according to regulations. They also diagnose and troubleshoot issues with clogged or broken components.

In both household and business settings, plumbers install and fix the pipes, fixtures, and appliances that enable the distribution of water, waste, and air. They operate in cramped and restricted locations using a range of instruments and methods. In order to guarantee that plumbing systems are established in compliance with rules, a plumber’s professional tasks also involve understanding construction codes and designs. Additionally, they identify and resolve problems with blocked or damaged parts.

Some plumbers specialize in specific fields or types of installations. For example, an industrial plumber handles large-scale piping systems and equipment found in manufacturing plants and power stations. Other specialties include gas line installation and repair, residential plumbing, and water heater repairs. Plumbers usually have a high school diploma and complete an apprenticeship program or earn a tradesman’s certificate.

Certain plumbers have specialized knowledge in particular areas or installation kinds. An industrial plumber, for instance, works with the massive piping networks and machinery that are present in power plants and manufacturing facilities. Residential plumbing, water heater repairs, and gas line installation and maintenance are among other areas of expertise. In addition to completing an apprenticeship program or earning a tradesman’s certificate, plumbers typically hold a high school diploma.

Leaking water from the side of a hot water tank often indicates that the unit is nearing the end of its life and needs to be replaced. To extend the life of your water heater, drain it regularly and take steps to prevent leaks.

You can try relighting the pilot light on your gas water heater if it is acting up. However, it’s important to read the safety manual before you attempt this task. There are real dangers associated with tampering with gas systems, and only a licensed plumber should attempt to do so.

If you notice that your toilets flush slowly or have a strange smell, the problem could be caused by a broken part. Most likely, the handle or flapper valve is clogged. A plumber will have the right tools and parts to fix this issue quickly and efficiently. A plumber can also replace your toilet if the damage is too severe to repair.

Sump Pump Maintenance

A sump pump removes water from a basement and discharges it outside the house. This prevents your basement from flooding during a heavy rainstorm.

sump pump

A professional should inspect your sump pump every two years. This includes checking the float switch and ensuring the pit is large enough. It also includes checking the discharge pipe for clogs and other problems. Contact Westfield Plumbing for professional help.

The float switch on a sump pump tells the motor when to turn on and off. If it gets stuck in the on position or becomes clogged, it can cause your sump to start and stop automatically at incorrect times and possibly damage your motor. Check the float switch regularly to make sure it isn’t stuck in the on position and that it can move freely.

A sump is a large underground basin that collects groundwater from around your home and pumps it out through a discharge line. It is important to inspect your discharge line annually for blockages or leaks that can cause the pump to fail and flood your basement. Examine the discharge pipe for cracks or other damage on the outside, as well as inside for signs of water and rust. If you notice any problems, it is best to have a professional plumber repair them as soon as possible to avoid a costly failure.

While you’re doing maintenance on your sump, be sure to clean the discharge screen on the bottom of the unit as well. This helps prevent debris from entering the pump and causing a breakdown. To clean the discharge screen, you will need to remove the pump from the basin, and carefully disconnect the discharge pipe leading to the outside of your house. If the pump is plugged in, you will need to unplug it and put it in a bucket or trash bag to protect yourself from getting sprayed with water and debris.

Once you have removed the pump, you can use a dry towel to wipe it down and degrease any extra grime that may have built up. You can also saturate the float switch in vinegar to help loosen any gunk that is stuck. Once the pump is cleaned, you can plug it back in and test it to see if it works properly.

When you plug the pump back in, you should hear and feel the motor start to run. If it doesn’t start, then the float switch needs to be repaired or replaced, and the pit must be cleaned out before attempting another test.

Check the Electrical Connections

A sump pump requires a bit more care than your average household appliance. It should be fully inspected, cleaned and tested at least once a year to make sure it works as intended. This includes removing the pump from the pit, checking the power source and cleaning the grate as well as the inlet screen or opening. It’s also a good idea to have a battery backup installed to protect your home against flooding in the event of a power outage.

The easiest way to test your pump is to simply pour water into the basin. It should activate when the float or pressure sensor rises to match the water level and begin pumping water out of the basin and into your discharge line. If the pump doesn’t turn on or shuts off frequently, it may be time to replace it.

Over time, the electrical components of a sump pump can wear out from continuous use. If you notice rust or corrosion on the parts of your pump, it’s important to clean them and lubricate the bearings. If you have a sealed pump, this isn’t necessary, but if yours is unsealed, it’s an easy step to take that can help prevent the need for repair or replacement down the road.

If you have a battery backup sump pump, it’s important to check the battery and replace it every seven years, or as recommended by the manufacturer. This is because batteries can wear out from repeated charging and discharging, forcing your backup pump to work overtime.

Your sump pump has two separate cords that plug into electrical outlets, one for the float switch and one for the motor. Unplug both and then plug only the motor back in. This will cause the pump to come on immediately if everything is in working order, letting you know that it’s ready to go when it’s needed. Be sure to plug the float switch back in as well, or your basement could be at risk of flooding if the pump doesn’t activate when it’s needed. Also, be sure to check that the discharge line leading outside is extending at least 20 feet from your home and isn’t clogged with debris.

Test the Pump

The sump pump is designed to divert water away from your home, preventing flood damage. To do this, it is necessary for the pump to be in working order. When a sump pump is not in working order, water can cause structural damage to your home. To test the operation of your pump, fill the pit with water and see if it turns on and begins to drain. In addition, be sure to check the discharge pipe to ensure that it is properly directing the water away from your home.

Make a note of the time when you perform this test so that you can track the pump’s performance over time. This can help you notice a decrease in efficiency or functionality that you can address with routine maintenance or repairs.

If your pump does not turn on, there could be a problem with the float switch. This may be because it is stuck in the “on” position, or because it is damaged. Alternatively, the float switch might be clogged. Check the float switch and clean it if needed. Then, test it by dumping a bucket of water into the pit and watching to see if the pump activates.

Another problem that can occur is when the pump overheats. This can be caused by a build-up of chemicals or iron. Regardless of the cause, this issue can be prevented by removing the cover and cleaning the pump with a brush. You can also flush the pump with a garden hose to remove built-up gunk and chemical residue.

The impellers of the pump can also become damaged over time, causing them to rotate unevenly and cause vibration and noise. Inspect the impellers for signs of damage. If they are damaged, it is a good idea to replace them.

Lubricating the bearings is another important aspect of routine maintenance for your sump pump. This can reduce friction and improve the overall function of your pump. Consult the manufacturer’s manual for detailed instructions on how to lubricate your specific unit.

Finally, it is a good idea to consider a battery backup for your sump pump. This can ensure that the sump pump remains functional during a power outage. This is especially important if you live in an area prone to severe storms or flooding during heavy rains.

Clean the Pit

A sump pump pit should be cleaned and inspected at least once a year. To do this, remove the pump and clean it thoroughly. This includes cleaning the grate, draining pipes, cleaning the float screen or inlet opening, and inspecting the power source to make sure its cord is in good condition. Then, put it back into the pit, filling it with water to keep it from running dry. It’s also a good idea to have a professional inspect your sump pump at least once a year. The professional will check six things, including the pit size, drainage pipes, a backup power source, and the discharge pipe and check valve.

Performing these routine tasks will help ensure that your sump pump can work properly and keep your basement safe from flooding and other problems. If you are not comfortable doing these maintenance tasks yourself, a plumber can help. They can also perform a full inspection and cleaning before the rainy season begins.

To perform these tasks, start by disconnecting the power to your sump pump and any other accessories, such as a battery backup. This prevents electrical mishaps and burns. Next, unscrew the bolts or screws that connect the pump to the discharge pipe. If there is any resistance, a lubricant such as WD-40 can help ease the separation. If there is any mould growing between the pump and the discharge pipe, scrub this area with disinfectant. After you’ve separated the pump and the pipe, inspect the bottom of the pit for solid debris that can clog it.

When you’ve finished, clean the pump and the pit thoroughly with a wet/dry vacuum cleaner. This will help remove any remaining sediment, dirt, and grime, as well as a sludge that builds up. Then, rinse the pump with a garden hose outdoors. Finally, clean the float switch and its connecting wires to make sure they are free of twigs, leaves, or other debris.

Once everything has been cleaned and inspected, it’s time to reconnect the power and test your sump pump again. Simply dump a bucket of water into the pit and observe how the float and valve respond. Once the water is removed, you can be confident that your sump pump is ready to protect your home from moisture issues this spring.

How to Fix a Leaky Faucet

Identify the cause of your leaky faucet. While a small leak is not a big deal, it could waste a lot of water over time. A 10-drop leak every minute can waste up to 300 gallons in a year. Check all fixtures in your home to see if any of them are leaking. Turn off your hot and cold water supplies, as well as the master water supply to your entire home. Next, you need to take the handle off the faucet. Remove it carefully by prying under the handles.

leaky faucet

You can repair leaky faucets on your own with the right tools and a little know-how. While most problems can be fixed at home, if you’re unsure, Plumbers Denton TX can help you out. While most of the jobs are simple and don’t require any special training, some are best left to the pros. You can also contact local plumbers for a free quote. When you do find a leaky faucet, remember to check all the parts carefully.

The first step to fixing a leaky faucet is to remove the decorative cap that covers the inner parts of the faucet. If you’re using a hand-held faucet, you need to shut off the drain. Then, take a flathead screwdriver and remove the decorative cap from the top, revealing the screwhead underneath. You’ll need a small flathead screwdriver to lift the decorative cap. The screwhead is hidden underneath the cap.

The next step is to replace the packing nuts and adjusting ring. Over time, the packing nuts and adjusting ring may loosen. Tightening them or replacing them will fix your leaky faucet. Another step is to check for pipe damage underneath your faucet. Inspect the pipes beneath the sink to check for any cracks or breaks. Broken pipes and poor connections can result in severe water damage and mold and mildew growth.

Inspecting a leaky faucet is a relatively simple DIY project. It requires patience and a few basic tools. Once you have a better idea of what you’re doing, you can move on to the next step. If you’re confident that you can do it, don’t worry! Despite the fact that fixing a leaky faucet is not hard, it does require some knowledge about plumbing. If you don’t feel comfortable taking apart your sink, you can seek help from a plumber.

A leaky faucet is a problem that needs to be addressed quickly and effectively. While it’s easy to fix a leak in your sink, you should be sure to get the help of a professional. This service will be able to repair the faucet properly and prevent any further damage. This is a very important job as it is important to avoid wasting money on a small problem. Fortunately, fixing a leaky faucet is easy and doesn’t require a professional plumber.

A leaky faucet can be fixed yourself, but it is a complicated process. Hiring a professional plumber is a good idea if you want to avoid pitfalls and minimize damage. Make sure the plumber you hire is licensed and has at least four years of experience. Then, he or she will be able to diagnose and fix the leak and any other issues that might have caused the problem. In addition to hiring a professional, you can also get a free estimate from various plumbers.

A leaky faucet is a problem that affects your home. It can cause major plumbing problems and cost you hundreds of gallons of water per month. Not only does a leaky faucet cost money, it can lead to major damage to your property. If you are unable to fix your leaky faucet, you may need to call a professional plumber. A professional plumber will be able to provide a free estimate and solve the problem.

There are a few things you should do if your faucet is leaking. Identifying the type of faucet you have will help you determine what you need to do to fix it. If you have a cartridge faucet, you’ll need to remove the ceramic disk cylinder and replace the cartridge. Once you have replaced the O-rings, you’ll need to replace the O-rings. The O-rings on a ceramic-disk faucet need to be greased with plumber’s grease.

Navigation