Having your vehicle repainted is expensive, so make sure you understand what the process entails. It will help you decide whether or not it’s worth the cost.
All paints require thinning with what are called “reducers” to provide the proper consistency for spraying. The ratios used vary, as does the drying time. Visit https://www.juanitosautobody.com/ to learn more.
Auto body painting is a complex process, and the results you achieve greatly depend on how well you prepare. It is important to take the time to clean, sand, and mask properly before beginning. If you skip these steps, your finished product will look sloppy.
The first step in preparing for paint is cleaning the vehicle thoroughly with a degreaser or solvent liquid. It is also a good idea to remove any emblems, non-painted parts, or accessories from the vehicle. Afterwards, the surface should be degreased once again to ensure proper adhesion and prevent any issues with the final product.
After washing and sanding, the next step in preparation for painting is applying a phosphate coat. This layer serves as a corrosion protector and helps the primer adhere to the surface. It also allows the primer to create a base for the subsequent layers of paint.
Once the phosphate coat has dried, you can begin applying the primer. The primer can be either water-based or solvent-based, depending on your preference and the type of paint you use. It is a good idea to follow the manufacturer’s recommendations for application and drying times.
When spraying the primer, you should do so in thin coats, allowing each one to dry before applying the next. It is important to avoid any drips or runs, especially on curves and corners. This step is usually done with an airless spray gun, but you can also use a conventional brush.
A few days after the primer has dried, you can start painting the car. After each coat, you should wait a few minutes for the paint to fully dry before sanding and buffing again. You should be careful not to apply too much pressure, or you may ruin the finish of the paint job.
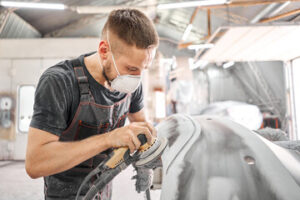
It is a good idea to wear safety goggles, rubber gloves, and a respirator when working with paint, especially solvent-based paint. It is also important to keep the work area clean and dispose of any waste safely. Finally, it is a good idea to use some form of protective wax to maintain your new paint job.
Primer
When dealing with bare metal or any body repair that involves sanding down the surface, auto primer is a must to ensure that your finish adheres properly. The primer is designed to bond to the surface and create a strong, durable layer that will be able to handle the paint you’re about to apply over it. If you skip this step, you’re likely to experience chipping and other problems down the line.
There are a few different kinds of primers that you can use, depending on your situation. For example, a self-etching primer is a good option for working on steel or iron surfaces because it contains an acid that etches into the metal to create a stronger bond between the surface and the primer. This also helps protect against corrosion.
Polyester primer surfacer is another great option for smaller body work jobs, as it has what’s known as excellent “build,” meaning that it fills in small dings and scratches much like putty or filler would, but then sands down very easily to give you the smoothest surface possible for paint adhesion. Finally, there’s moisture-cured urethane primer, which is the best choice for those working on a vehicle that was originally rusty and needs to be sealed off from further rusting.
Whichever kind of primer you choose, it’s important to allow the recommended curing time between coats. This will vary between types but is always noted on the primer’s label. Smears and poor curing are two of the biggest reasons for paint failure, so be sure to follow the instructions carefully.
You’ll usually need 2–3 coats of primer before moving on to the next step. Each coat will take about 10 minutes to spray and about an hour or more to dry fully. Be sure to keep an eye on the weather as well; if it’s too hot or humid, the primer may not be able to dry in time. Be sure to test your primer on a hidden area of the vehicle before applying it to the whole thing!
Base Coat
The base coat is the actual color of paint that goes on top of the primer layer. It can be either solvent-based or water-based, but most automotive painters opt for two-stage paint systems. They have a urethane base coat and a clear coat that provides shine and protection. This system is preferred over single-coat painting because it helps prevent rust and corrosion on the metal frame.
Choosing the right base coat is crucial for any auto body repair or repainting job because it determines how long your finished product will last. The base coat not only protects the bare metal of your vehicle from moisture, but it also creates an effective barrier against chipping and scratching. The base coat is also the layer that determines whether or not your painted car will be glossy or matte.
There are various types of paints used for the base coat, and each has different benefits. For example, acrylic lacquer is a quick-drying paint that can match the original factory color of your vehicle. It is usually sold in aerosol cans and is perfect for touch-up repairs and other small jobs. This type of paint is low in chemical toxicity and has a spray nozzle that allows you to easily apply it to the surface of your vehicle.
Other types of base coats include urethane and enamel. These are more durable and long-lasting, but they also have higher chemical toxicity levels. Therefore, they require more maintenance and safety precautions than other types of auto paint. However, they are still ideal for most repair and repainting jobs.
It’s also important to note that some paints are not suitable for use as a base coat. They have lower durability and chemical resistance, so they should only be used as a top coat. These paints include, but are not limited to, nitrocellulose, melamine, urethane, and acrylate.
Once you’ve applied your base coat, it’s time to start adding top coats. You’ll need to add four or five top coats before you can fully complete your project. While this may seem like a lot of layers, it is necessary to give your vehicle a smooth and shiny finish. If you’re unsure what type of top coat you need, ask the professionals at your local automotive paint store for advice.
Clear Coat
Clear coat is a layer of acrylic and polyurethane that acts as a protective shell over your paint. It enhances the color and shine of your vehicle and is also resistant to oxidation. Compared to older single-stage car paints, clear coat provides a much-needed layer of protection. Nevertheless, it is still vulnerable to a variety of environmental contaminants, such as industrial debris, acid rain, airborne pollutants, bird droppings, bug splatter, and road salt. If left unprotected, these can erode the surface of your paint and cause it to fade over time.
Car owners should regularly wash their vehicles and wax the clear coat to keep them in good condition. However, it is important to note that not all cleaning methods are safe for the clear coat. For example, the use of harsh chemicals and abrasive rubbing can scratch the surface, which can result in micro-swirls. Using a high-quality car wax or paint protectant like Torque Detail’s Graphene Burst can help extend the life of your clear coat and prevent it from deteriorating.
In addition, you should avoid wet sanding a clear coat. This type of work can damage the underlying base coat, resulting in a costly repaint. Instead, it is recommended to contact a professional body shop to perform any wet sanding or buffing on your vehicle.
It’s also a good idea to wear a respirator when applying any spray paint or primer. If not properly diluted, these products can contain volatile organic compounds that can irritate your skin, eyes, and lungs. In addition, wearing a full-body paint suit and nitrile gloves will keep you protected from any accidental spills or mishaps.
Whether you choose to apply your own clear coat with an aerosol spray can or a paint gun, it’s important to follow the manufacturer’s directions carefully. Spraying too thickly may create puddling, while spraying too thinly will create uneven coverage and a dull finish. Lastly, you should apply multiple thin layers to ensure even fading and durability.
Although a clear coat does provide some level of protection against the sun’s UV rays, it is very difficult to repair once damaged. For this reason, it is a good idea to have your car professionally painted as soon as you notice any signs of fading or other problems.