Generally, only Asbestos Removal Perth WA should handle materials that could contain asbestos. When disturbed, asbestos releases needle-like fibers that can cause lung disease.
Before work begins, get a contract specifying the work plan, cleanup, and federal, state, and local regulations that the contractor must follow (such as notification requirements and asbestos handling and disposal procedures). Ask about accreditation.
Before starting to work with asbestos, a professional inspection must be undertaken. This is especially true if the building you are working in contains a lot of asbestos or if any demolition work is being done on the structure. Asbestos can be found in a variety of materials, including textured paint, floor and ceiling tiles, shingles, insulation, pipe wraps, and some roofs. It is important to note that there is no known safe level of exposure.
It is recommended that the entire area to be worked in be surveyed and cleaned by professionals before beginning any work. A good cleaning can prevent the spread of asbestos fibers and will also remove any dust particles that have already been released into the air.
If a building contains significant amounts of asbestos, they must develop an asbestos removal control plan before work starts. The control plan must contain a risk assessment, cleaning methods, and containment details. They must also train workers about the risks associated with asbestos and how to identify and manage them. This includes specialized training and licenses for asbestos assessors, removalists, and supervisors.
Those who are not trained should not be allowed to work with asbestos. Inhaling asbestos fibers can cause a range of health problems, from respiratory irritation to mesothelioma, a fatal cancer that affects the lungs and chest wall.
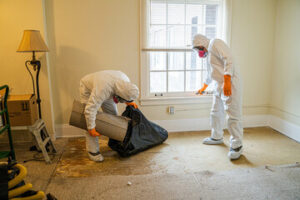
All tools used in an asbestos removal project should be fitted with exhaust ventilation dust control hoods. All employees must wear disposable coveralls with fitted hoods that prevent penetration of asbestos fibers (type 5 category 3), impermeable gloves, gumboots, and shoe covers. Eye protection is also required. Facial hair mustn’t be worn to ensure the proper fit of the respirator.
The work area should be closed off from areas that don’t require abating. Warning signs and barriers should be put up to ensure that people avoid the area. All vents must be covered to prevent contaminated air from entering, and all openings should be sealed with plastic sheeting. All rubbish must be wetted using a fine mist of water and double bagged before being removed from the site and disposed of in an appropriate asbestos landfill.
If asbestos-infected material is to be removed, the process must take place in a decontamination area. The work should be conducted by a certified asbestos abatement contractor who follows state and local laws for notification requirements, removal, and disposal. Upon completion, the abatement technician will thoroughly clean all surfaces, floors, ceilings, and equipment in the working area, and they’ll perform extensive air and material testing to confirm that asbestos levels are below OSHA regulations.
In addition, workers should follow strict decontamination procedures to protect themselves. They must wipe down all work clothing, disposable items, and tools before leaving the work area. Any contaminated materials and cleaning rags should be double-bagged in 6-millimeter plastic bags with a sealant and properly labeled before disposal. These bags should be placed in sealed and labeled, leak-proof, heavy-duty garbage containers that are only to be disposed of in a landfill designated for asbestos waste.
Non-friable asbestos-containing materials (ACM) like floor tiles, roof shingles, and exterior siding do not release harmful fibers when they’re disturbed, but friable ACM such as asbestos pipe insulation, boiler lagging and blown-in insulation can. These materials can be pulverized, crumbled, or reduced to powder by hand pressure when dry and can cause inhalation hazards when they’re airborne.
While no level of exposure to airborne asbestos is known to be safe, medical, environmental health and safety organizations warn that breathing in loose, airborne fibers can put you at risk of developing an illness. This is why it’s critical to minimize the release of airborne asbestos during home renovation projects by covering all exposed surfaces and wearing proper personal protective equipment (PPE).
PPE includes coveralls, rubber gloves, eye protection, and a respirator. Several pairs of durable, disposable coveralls with built-in booties should be worn by each person who’ll be working in the removal area, and each set of coveralls should be wetted before a worker exits the work zone. Before each session, lay down an entrance/exit “transition zone” strip of plastic along the wall where the removal will be done, and after each work session re-wet all coveralls, and wipe down and remove rubber boots, gloves and goggles.
Once the asbestos has been removed, it must be disposed of correctly. Unlike other hazardous waste, asbestos cannot be included in household rubbish collection services and must go to a specialist site that is licensed to accept it. It is often best to leave the disposal of asbestos waste to a professional, as it requires careful handling and specialized transport equipment that can prevent any further contamination during the journey.
An experienced asbestos removal company will ensure that the waste is double-bagged and labeled before being transported to a landfill site. This is to minimize any risk of the fibers escaping and infecting the surrounding environment. It is also important that the waste is kept separate from other materials to minimize the risk of cross-contamination. In these environmentally-conscious times, it is increasingly popular for asbestos to be recycled, rather than thrown away. This process involves heating the asbestos to destroy its harmful properties, resulting in a non-toxic material that can be used in a range of products.
The waste must be wetted down before it is moved, to prevent any airborne fibers. If this is not done, the waste can cause serious harm to people, animals, and the environment. It is also vital that it is not broken into small pieces, as this will increase the risks of airborne asbestos.
Before the contractor begins work, you should make sure they have a written contract specifying the work plan and cleanup procedures. You should also contact your state and local health departments, the EPA’s regional office, and the Occupational Safety and Health Administration’s region to find out what regulations the contractor must follow (e.g. notification requirements and asbestos disposal procedures).
Ideally, the contractor should wet down the asbestos with a hand sprayer before removing it. This will prevent the asbestos from releasing airborne fibers during removal and will also make it easier to clean up.
If you suspect improper asbestos removal has taken place in your home, you have a right to report it. You can report it to the Environmental Protection Agency, the Occupational Safety and Health Administration, and your county and/or state Department of Environmental Quality.
A qualified asbestos professional can assess whether your home has asbestos and, if it does, will safely remove it. A licensed contractor will follow strict guidelines to prevent releasing airborne asbestos fibers. They will wet the materials before attempting to remove them, use a “negative air” machine that draws the air in from the abatement area through a series of filters (including HEPA) and exhausts it outside the affected areas, use a special decontamination enclosure to allow workers to leave the work site without touching contaminated items and regularly test the air to ensure no elevated levels of asbestos are being released.
If the materials are in good condition and not disturbed, asbestos exposure is very low. However, if they are sawed, sanded, or scraped, or the glue in floor tiles is broken up, tiny asbestos fibers can become airborne and be breathed into the lungs.
The human body’s natural defense systems will remove the majority of these minuscule fibers, but some can bypass these defenses and lodge deep in the lungs. This can cause serious health issues including lung diseases such as fibrosis and mesothelioma, respiratory problems, and gastrointestinal illnesses.
If you are considering doing some minor repairs or renovating your property, check with a licensed asbestos consultant to ensure that it is safe to do so. Major repairs and renovations should be left to professionals trained in the methods of asbestos removal.
Asbestos is found in a variety of building materials and products, from floor tiles to roof shingles to exterior siding, cement, automotive brakes, and acoustic/structural insulation. If these materials are damaged, the asbestos fibers can become airborne and ingested, causing health hazards. If you have asbestos in your home, never attempt to saw, sand, or scrape it yourself, as this will release the asbestos fibers into the air. Instead, contact a licensed asbestos contractor to remove it safely. They will be able to recommend alternative ways of repairing or replacing the asbestos material and will ensure that all necessary safety procedures are followed. They will also provide you with the proper documentation and disposal instructions for your asbestos waste.